Thursday 31 December 2020

Something to look forward to


As 2020 closes and we step into a new year, it is a time to pause and and reflect on the past year and plan what new adventures await in 2021.  I often thought that 2020 would be the year I would retire but I was able to do that a few years earlier than planned.  The extra time afforded me the opportunity to attend some tatting conferences in 2019 and meet many tatters.  Then in 2020 I  kept on tatting and blogging and zooming to keep in touch with all my fellow crafters.

I do have something to tell you and it is quite exciting in 2021 and that is Ms. Jane Eborall will be hosting another TIAS.  You can find details about it here.  Of course she does not share much as that is part of the fun.   

I can't wait to see what threads and shuttles will be shared as the TIAS moves forward.  If you are a tatter, please be sure to send in your tatting so we can all be inspired .

I wish you all a prosperous and healthy 2021.  Stay safe, tat and carry on.

Tuesday 22 December 2020

First Attempt at Design

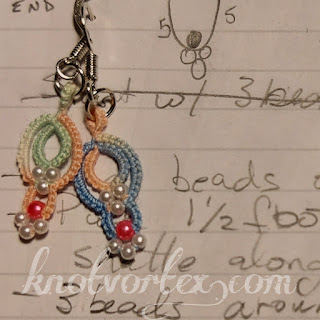
These are my first attempts at design, Single Shuttle Earrings. I made these earrings with some left over thread on a shuttle, they are not very big so they could handle a long dagger bead on the bottom or other embellishment. The prototype was made with metallic thread and by ending with a single shuttle split ring (SSSR) you are able to easily hide the ends.

Nothing fancy or new here but I took some time to make a diagram in Inkscape which was really fun and didn't take too long.  

I have also included a photo of one done with metallic thread using different stitch counts and bead placement.

If you are interested I have included the instructions below.

Load beads on shuttle, pull 18 inches or 45 cm off shuttle along with 3 beads.  You will need to anchor this end so you don't lose your beads.  Using the diagram, start at star, end at triangle. Start first ring with 3 beads from shuttle round the hand
R 10 (3b) 10
C 14 lock join to picot between beads in first ring 5
make 4 bead picot with 3b from ball 1 b from shuttle 5 lock join between beads in first ring 14
Tie knot before making SSSR
SSSR hiding ball thread in 1st 4 stitches of ring
Add additional picots or beads as desired. 

I have had this sitting on my desk for some time and needed to get it posted before the end of the year.


Thursday 17 December 2020

Icy Blue Snowflake


 If you need practice with bead placement this is the perfect project.  Designed by Marie McCurry of WestPineCreations.  She now has a sales page with instructions available here

The pattern works up quickly and depending on the size of thread will determine the size of the snowflake. I used seed beads and my neverending spool of Wonderfil Spagetti thread.


Tuesday 8 December 2020

First Snowflake


No, not my first but one designed by Grace Tan called First Snowflake and Variation which you can find here.  It works up fast and easy.  I did it in one pass using a split chain.  I think it needs some beads, so 60 on the shuttle to cover the picots on the final ring and another 18 on the shuttle for every picot except joining.

Do you see the variation?

Monday 7 December 2020

They are here


 These hand painted shuttles in ruby red were commissioned to mark the 40th Anniversary of the Ring of Tatters.  

Wednesday 25 November 2020

Size Matters


Yes, size matters when it comes to picots.  These are small, medium and large picots all done with the same stitch count, creating three different looks.   This is the Star in 2 Colors with Pearls by Inga Madsen from the book "Christmas Decorations in Tatting". Below you can see what they look like on the other side.  I also did one without beads.

These are all done using vintage thread size 70. The white was a Lily the red a Coats and Clark thread with price tags 15 and 10 cents respectively.  


Tuesday 24 November 2020

Inga Madsen


Here is a lovely snowflake I received from Inga Madsen  She has a new tatting book "Christmas Decorations in Tatting" and was matched with me in a tatting exchange arranged the The Fringe Element Tatters.  The snowflake made its way from Denmark to me in Canada. Thanks Inga, this one will go on my holiday tree.

Friday 20 November 2020

Joyce's Angel


She is called Joyce's Angel but she will be going to my sister who has a holiday tree full of angels and her favorite color is blue.  This is a pattern by Martha Ess and available on her blog here

I tatted this using my never ending spool of Wonderfil thread. It works up in a size 80 to a final size of 6 cm or 2.5 inches.  I added beads to the first six picots or the pattern gives stitch count for a halo.

There is also another discussion of this  Angel using a half moon split ring.

With the Wonderfil thread still on the shuttles I made up these quick earrings found on Facebook site of Svetlana Borovik or on Youtube video here.  I do not like how the two ends finish up so I have an idea on how to make these sit better on the ear wires.


Thursday 19 November 2020

Star Motif

 This is Star Motif from the pamphlet Tatting by Penelope Book 3. The picture is at the beginning of the book but the instructions are at the end.  I was inspired by this motif when I first learned to tat and will admit that I COPY TATTED it.  It was a time before I learned to read patterns so I counted stitches.  I felt so bad that I worked to obtain the pattern legally and now have done that and along the way also supported many tatting artists by purchasing shuttles, books and thread.  

I love to tat this pattern.  I do it with two shuttles, using split rings and a split chain to climb to the next round. I tat this at least once a year.  The top pattern is done in a size 80 vintage thread and woks out to 4.25 inches.  It has made its way to Europe in a tatting exchange.  The lower one was done with Wonderfil thread, I made two Wonderfil motifs which will be given away in a local exchange later this year. 

Size 20 yields a star 5.5" size 10 yields a star 7.25" and size 80 makes a star 4.25"


Sunday 15 November 2020

More Earsavers and Mask Chains/Lanyards

I had given away all my other ear savers so I made more. I added the buttons at the first join from each end and then added beads to make them pretty. These are done in a size 10 Lysbet super cotton thread. If you are interested in making some for yourself, family and friends just try this Pattern from Vicki.

If  you made these longer, add a clip to each end and attach the clip to your mask ear elastics you could remove your mask and it would hang on your chest.  Then you could easily remove it and put it back on without touching the mask, just the  elastics.  It would be similar to my eyeglass lanyard so I never lose my glasses. Actually any lonely necklace would work if you could add a clip or safety pin to each end.

I have also seen bits of tatting added to the side of a mask like a charm.  They can either be attached or left to swing like earrings. 

No matter what your do with mask embellishment tatting be sure to wash between uses.  

Thursday 12 November 2020

New Nametag


I had been using a piece of paper with my name on it at our local guild meetings when this heart shaped aida became available on the garage sale table.  I purchased it and then taught myself cross stitch to complete a new nametag.  Those other bits are supposed to be shuttles and a flower. I plan to use the blank upper right area ,with an appropriate pin, to attach the nametag on.

It needed a little tatting. This edging is called Hen and Chicks and is a vintage one shuttle pattern.  Had I used a picot gauge the bare thread between rings would have been more consistent and neater.  I stitched the tatting on the nametag going through the picots.  You can view how to do Hens and Chicks by Frivole on her You tube channel.

I used a Wonderfil thread Spagetti a 12 wt Egyptian cotton which is double gassed making it a great thread for tatting if you like to use small threads.


Tuesday 10 November 2020

Three Flakes


These snowflakes appeared on Renulek's blog many years ago.  I always wanted to do them and this was the year. Renulek also has an Etsy page where you can purchase her designs. 

I used an ivory Coats size 20 vintage thread.  Each flake is created in three parts, three rounds with first round intertwined with the second. 

I have sent these off in an exchange arranged by the Fringe Element tatters so I will create three more for my own collection.

Tuesday 3 November 2020

And Then This Happened

I may have mentioned before that I belong to a few local guilds.  One of them, the Calgary Guild of Needle and Fibre Arts (CGNFA) had an in person meeting in October and on the tables were needles, thread, cloth to stitch on (sorry I don't know what this is called) and some seasonal patterns to keep us busy while social distancing.  Most of the patterns were simple and could easily have been completed within the meeting and using only a few colors. 

But no, I chose something that would take a bit longer.  I only had a picture to go by but searched my stash and came up with enough colors to complete the sample. 

I learned a lot about thread and counting while completing this little project. 

Learning new stitches and getting encouragement from everyone is just one of the perks of belonging to a guild.  


Saturday 19 September 2020

More Crochet

My neighbor mentioned that she had recently had an oak table refinished and was looking for a tablecloth.  I searched my cupboard and gifted her his one.  I told her my husband didn't like the color so I rarely used it and it would need a quick iron. 

She tried it on the table and was pleased with the fit. She was very grateful and even more so when I told her I made it.  Had to have been 30 years ago but spent more time stored than used.  At the time, I subscribed to a crochet magazine and would make the regular doilies in size 10 cotton thread so they would fit a round table I once had. 

To give you and idea of the size, in the picture the table is 48 inches or 122 cm in diameter, the cloth is not ironed. 


Thursday 17 September 2020

Forgotten


Many years ago crochet was my go to  craft and I used to create many one of a kind patterns.  Recently I ran across this glove almost finished.  Oh well another project to be done... one day.

Wednesday 16 September 2020

I've been knitting

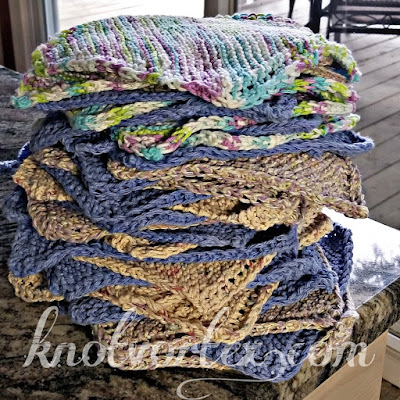
My sister in law mentioned the other day that she wanted some dishcloths. Apparently her daughter in law loves them. I knew I had  cotton yarn waiting to be used and began to knit and knit and knit.  This is an easy pattern and after some trial and error used this technique to create smooth edges,

I started with 4 stitches, then for each increasing row: purl into the front of the stitch, knit one, yarn over, knit to last stitch, slip knitwise.

For each decreasing row, purl into the front of the stitch k2tog, yarn over, k2tog, knit to last stitch, slip knitwise. 

I have heard this called Grandmother's Favorite Dishcloth but for me it is my go to pattern for dishcloths.  I still have quite a stash of cotton thread to use up.

I will get back to tatting soon.

Thursday 6 August 2020

Daniela Mendola


I have completed this small mat by Daniela Mendola.   You can find the free pattern on the blog here.  There are nine rounds and I used two shuttles and climbed to each row using split rings and split chains.
   
I made the first repeat of the last row incorrect so I just continued with the incorrect version for the next 11 repeats.  I thought with 12 points that this would fit a clock face but the clock I had in mind was too small and with my larger clock is not able to come apart so I am back on the hunt for a clock or smaller 12 pointed pattern.

 I used a vintage size 80 thread Star Six Cord shade 144.5. The finished piece measures 8 inches or 20 cm diameter. I had some issues with the thread breaking at a few rings.  Ahh the joys of using vintage thread.

Wednesday 5 August 2020

A Fruit Full Day

 We are mid summer and time to harvest some fruit. Early morning I got after the raspberries and added to the stash I had been collecting the past few days, There was now more than enough for jam.   Mashed them and made up 7 and a half pints, plus some skim. It is so good

Before the heat of the day sets in I am off to gather saskatoons and nanking cherries.  I didn't get much of each as these are in a city yard but cleaned and froze them for later use. 
.


With all the fresh fruit available our bananas are overripe so they became muffins.


Monday 13 July 2020

More swiffer pads

My last ones didn't wear out but became too flat and just didn't t do the job as well soooo here are some new ones.  My own pattern which I just made up as I went along.   I constructed these in one pass start to finish. They slip on like a slipper and have a tie to keep them in just the right spot.  

They can be easily removed for cleaning and reused.  I always make at least two so that there are no excuses for cleaning.


Friday 10 July 2020

Ear cozy

This is what I did today, replaced those foam covers on a very useable headset with crochet cotton ones.  It took only a few minutes.

I started with 12 double crochet in a circle, then doubled that on the next row.  Next a row of single crochet then a row of half as many and finish off.  Now make another and done.  

Thursday 9 July 2020

Knitted Slippers


 You might think I live in the Southern Hemisphere as I have  knitted some warm slippers, but no I just found more yarn.  You can see the label below and I believe this is a lovely 3 ply worsted Merino wool from  Norway.  The label say it was made in 1965.  Please correct me if I am  wrong.  I have three large skeins, all different color blends.

I made these slippers after converting a free pattern from  instructables.com   It took me a few tries to get the size correct but I've written the pattern out so I can make another when needed.  

How does one "find" yarn, every crafter knows. :) 


Thursday 23 April 2020

I Should Have Been


I should have been on the road with one of my favourite tatting mates, travelling to a conference and a new adventure instead I am at home keeping busy. 


These are ear savers.  I added the buttons as I tatted at the ring join.  Just pull a loop of  ring thread  up through the button, then down through the joining picot then the shuttle goes through this loop.  Making sure the core thread still moves,  tighten up the thread so the button sits right on the join.  This pattern is one that Victats posted on  a facebook group.

The thread is about a size 5 so I needed to add some extra rings to the pattern.  It is a called Twilleys Lysbet Super Cotton and tatted up very nicely. 

I completed these ear savers to use if you need to wear a mask for an extended time. The mask loops go over the buttons instead of your ears. And to go with the ear savers below are some masks I made. If you recall I am still learning to sew and need to perfect my skills.  I am part of a group making masks for free.

Now regarding the ear savers, these are quick and easy, it took longer to find two matching buttons so it they need to be discarded with a mask that's ok but I believe they would survive a wash or two. 

Sadly I had lost my tatting mojo for a while and haven't blogged but feel I have it back now that so expect many more new things happening both tatting and other crafty things. 


Sunday 29 March 2020

From Down Under

I participated in another Fringe Exchange and received these beautiful tatted items all the way from Sydney Australia. We were to exchange a favorite pattern.  I sent my go to butterfly heart of course and received these from Ms DS.  

She states that she tats these,  the larger an anklet and the  smaller  bracelet, to entice the younger generation into the world of tatting .

The ankle bracelet is made using the balanced double stitch (BDS) and the smaller bracelet using the spiral chain.  the beads are a lovely black 4mm crystal and unfortunately one of them broke in transit. 

This is the link to the FRINGE ELEMENT TATTERS website so you can see what this is all about. 

Saturday 21 March 2020

Metis Beadwork

In mid February I took a Metis Beadwork course offered by the Calgary Guild of Needle and Fibre Arts.  The class was a full day and a reasonable cost.  The teacher Deborah Fitzsimmons provided kits which included pattern, beads, threads, needles, cloth and instructions.

She calls this piece Blue Flax & Rocky Mountain/Wood Lily - Grassland Flowers.  We used a two needle method, couching over the row of beads.  Deborah also provided many hints with her detailed instructions. 

During the class I was only able to do a few outlines.  The piece did not really come together until I did the stems.

The centre small orange flowers and the amber ground runner are vintage beads made in  Murano Italy 1800's to 1920.

Tuesday 17 March 2020

Happy St. Patricks Day


I had made two previous pairs of earrings and brought them to my guild for show and tell last week.  I had a request for them so I gave them away.  Of course I needed to make another pair for myself .

These shamrocks with the celtic knot in the centre are a pattern from Yarnplayer, Marilee Rockley.  She has provided a free pattern here.  I made slight pattern alterations by using a SSSR to finish and hide ends in the stem.  I used another the SSSR again in the second round; a ring for the earrings attachment.  This is one of my favorite ways to end an earring especially to hide both ends.

Monday 13 January 2020

Hold on a minute

Another year here and many new things happening in 2020. Firstly on the tatting front I must get some of my projects finished from past conferences and workshops.

I will post my progress as it happens.

I have also been reviewing conferences I want to attend in 2020 and reviewing costs and logistics.  I hope to see many of my tatting friends and see all the wonderful things being done round the world.

If you have ever considered attending a workshop or conference please do so.  It is very rewarding and will give your craft a boost, plus it would be fun to see you too.

Below are the tatting events happening in 2020 with links to the web pages.

Finger Lakes  CANCELLED

Shuttlebirds  CANCELLED

Tatting Corner Tat Days Rescheduled

Palmetto

Fringe Element Tatters  CANCELLED

Happy Tatting


Thursday 9 January 2020

Test tat

I was asked to test tat a new little motif by Robin B a new tatting designer.   You can find a link to the pattern on her facebook Robin's Nest Tatting Designer page here

I love how it almost looks interwoven but it is not.  Just three little rounds.

I started on a chain and used a split ring to climb to the second round.  Then I added magic loops to the first and last chain and no ends to sew in.

Using a Coats thread size 20 the small doily measures 4.25 inches from point to point.

To start on a chain you can use a paper clip or one of those coiless safety pins.  You might try what I did by starting with an unflipped second half and then with a flipped second half counting as the first double stitch and you can remove your paperclip once the chain is completed. 

Thursday 2 January 2020

More Exchanges

 This array of  card, flattened bottle caps and the beaded and tatted bell covering the glass bell ornament arrived today from Kentucky.   The sender packaged it well and the glass ornament arrived safely.

Thanks to the Fringe Element Tatters another exchange completed.


Also below is the cover to a needlebook I received from an exchange  held by a guild I belong to. It is so cute how the needlebook is the front and back of the house.  I love it, you can never have too many.

Maybe just me but that house is asking for some tatting don't you think?